Quick Start
Run the full Cloud Health Office platform locally on Kubernetes, validate claims adjudication, run a scored Million Claim Challenge workload, and inspect the run evidence in the operator console — no Azure account needed.
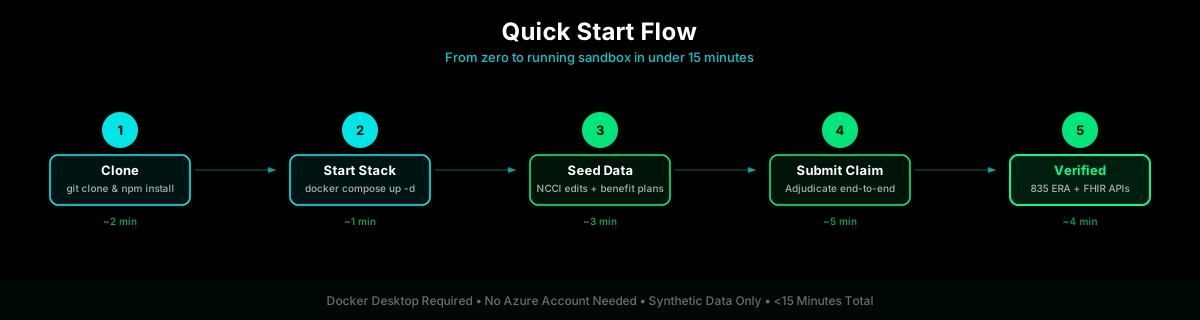
By the end of this guide you'll have the full service suite running in the cloudhealthoffice namespace with MongoDB, Redis, the portal, FHIR, claims, payment, enrollment, provider, and supporting services. You'll run a claim through adjudication, execute a scored 1,000-claim benchmark, inspect its evidence in the Mass Adjudication console, and verify CRD discovery.
The latest published Cloud Health Office proof runs the full 1,000,000-claim corpus through asynchronous Service Bus adjudication in local Docker Desktop Kubernetes: 155.89 claims/sec, 910 ms P95, 1,205 ms P99, and 129,980/130,000 workflow checks matched inside the observation window. Scope matters: this is local engineering evidence, not a production-cloud capacity claim.
The validator recorded 122 claims outside its 180-second observation window. Post-run checks found all 1,000,000 claims terminal, 2,000,000 lifecycle events, zero dead letters, zero pod restarts, and no claims-service error logs. Part 15's 123.81 claims/sec result remains the strict zero-platform-failure baseline; Part 16 is the faster asynchronous result with its reconciliation limitation disclosed.
Getting there took several rounds of prior work. A 500,000-claim run at 2x the prior scale (61,063/65,000 workflow checks matched, zero platform failures) turned up two fixture-generation bugs and found the real Submit-chain bottleneck one layer underneath the guessed one: a shared MongoDB instance throttled more than it ran, on a CPU limit never touched by earlier app-tier fixes. Fixing it brought throughput to 186.06 claims/sec at the time. That run also reproduced a smaller version of an unexplained wall-clock gap, later traced to macOS suspending the local Kubernetes cluster mid-run and fixed by keeping the machine awake for the duration of a run. Every scenario this series ever disclosed as unsupported was then converted to a real, scored outcome, and a separate investigation found and fixed why the benchmark's highest concurrency setting (parallelism 56) had quietly underperformed lower concurrency for its entire run — two single-replica services throttled under CPU limits nobody had profiled at that load, and a memory ceiling the fix immediately exposed once throughput actually rose.
Inspect the latest 1M evidence or read Part 16: The Million Went Through the Bus.
Want the story behind this walkthrough? The full local Kubernetes field-note series follows the path from first deployment to repeatable Million Claim Challenge benchmarking:
- Part 1: Running a Healthcare Claims Platform Locally in Kubernetes, Then Validating Real Workflows
- Part 2: From It Runs to It Measures
- Part 3: From It Measures to It Explains
- Part 4: From It Explains to It Improves
- Part 5: From Faster to Repeatably Faster
- Part 6: From Fast Runs to Honest Edge-Case Scoring
- Part 7: From Benchmark Logs to an Operator Console
- Part 8: The Clean 100,000-Claim Run
- Part 9: From Unsupported to Scored
- Part 10: The Migration Cost That Wasn't
- Part 11: The Check That Only Ran in the Benchmark
- Part 12: The Database Nobody Profiled
- Part 13: The Gap Was the Laptop
- Part 14: Zero Unsupported, Then the Parallelism Nobody Profiled
- Part 15: One Million Claims, and the Bug Only That Scale Could Find
- Part 16: The Million Went Through the Bus
This guide walks through the full Kubernetes-shaped deployment. If you just want the core adjudication services running quickly without Kubernetes:
git clone https://github.com/aurelianware/cloudhealthoffice.git
cd cloudhealthoffice
docker compose --profile core up -d
curl http://localhost:5001/health/live
See the README Quick Start for the full profile list and the complete-stack (docker-compose.development.yml) option.
Prerequisites
| Tool | Version | Notes |
|---|---|---|
Docker Desktop | 4.x+ | Kubernetes enabled; 16 GB memory minimum for small runs, 18 CPU / 24 GB allocation recommended for 100K validation |
kubectl | current | Bundled with Docker Desktop |
bash | 4+ | macOS: brew install bash |
curl | any | For API calls |
jq | any | Optional — for pretty JSON output |
1. Clone the Repository
Clone the repository
# Clone
git clone https://github.com/aurelianware/cloudhealthoffice.git
cd cloudhealthoffice

# Confirm Docker Desktop Kubernetes is selected
kubectl config current-context
kubectl cluster-info
2. Deploy to Local Kubernetes
Build images and deploy the platform
bash ./scripts/deploy-local.shThe script builds local images, creates the cloudhealthoffice namespace, deploys MongoDB and Redis, creates local secrets, applies service manifests, and waits for the core rollout. First run can take 15-30 minutes depending on Docker cache and CPU.
For repeat deploys after images are already built:
bash ./scripts/deploy-local.sh --skip-buildVerify the deployments:
kubectl get deployments -n cloudhealthoffice
kubectl get pods -n cloudhealthoffice
Every deployment should eventually show 1/1 ready. The main services used below are:
| Service | URL |
|---|---|
| portal | http://localhost:8080 |
| claims-service | http://localhost:5001 |
| benefit-plan-service | http://localhost:5002 |
| payment-service | http://localhost:5006 |
| fhir-service | http://localhost:5080 |
3. Open Local Access
Port-forward the services used in the walkthrough
Run these in separate terminals, or append & to background them:
kubectl port-forward -n cloudhealthoffice svc/portal 8080:80
kubectl port-forward -n cloudhealthoffice svc/claims-service 5001:80
kubectl port-forward -n cloudhealthoffice svc/benefit-plan-service 5002:80
kubectl port-forward -n cloudhealthoffice svc/payment-service 5006:80
kubectl port-forward -n cloudhealthoffice svc/fhir-service 5080:80
Open the portal at http://localhost:8080. API calls use the local seeded tenant header X-Tenant-ID: demo.
4. Validate the Claims Workflow
Seed data, submit a claim, and run adjudication
CLAIMS_URL=http://localhost:5001 \
BENEFIT_URL=http://localhost:5002 \
./scripts/seed-local.sh --tenant demo
The script seeds NCCI edits, creates a local PPO benefit plan, submits a professional claim, runs adjudication, and updates the claim with the adjudication result. The summary prints the claim ID, allowed amount, plan payment, and member responsibility.
5. Run the Million Claim Challenge
Run a scored 1,000-claim validation
The validator generates a deterministic corpus, seeds the run-scoped fixtures needed by the platform, submits and adjudicates the claims, checks persisted pend state, scores workflow outcomes and comparable payments, and publishes the run summary to claims-service.
Start at 1K. Treat 10K as a confidence gate. Attempt 100K only after the smaller run is clean and the Mass Adjudication console can load the published run.
CLAIMS=1000 \
MAX_CLAIMS=1000 \
PARALLELISM=10 \
PROGRESS_EVERY=100 \
JOB_NAME=mcc-quickstart-1k \
./scripts/run-mcc-local-k8s.sh
The first invocation builds the validator image. The command waits for the Kubernetes job and prints the final evidence summary in the same terminal.
Confirm that the final summary reports zero platform failures, zero workflow mismatches, zero observation timeouts, zero unexpected pends, and zero payment mismatches. Unsupported scenarios are named product gaps; they are reported separately and are not counted as passes or platform failures.
If the terminal disconnects, inspect the same job directly:
kubectl get job -n cloudhealthoffice mcc-quickstart-1k
kubectl logs -n cloudhealthoffice job/mcc-quickstart-1k
Inspect the published run in the console
Keep the portal port-forward from Step 3 running, then open http://localhost:8080/mass-adjudication-runs. Open the newest run to review throughput, P95/P99 latency, outcome counts, workflow scoring, payment accuracy, and retained claim-level evidence. Filter by validation status to inspect unsupported or mismatched rows, then open a claim for its persisted adjudication and benefit breakdown.
Scale up only after 1K is clean
# 10K confidence run
CLAIMS=10000 MAX_CLAIMS=10000 PROGRESS_EVERY=1000 \
JOB_NAME=mcc-quickstart-10k ./scripts/run-mcc-local-k8s.sh

# 100K milestone; use the recommended 18 CPU / 24 GB Docker allocation
CLAIMS=100000 MAX_CLAIMS=100000 PARALLELISM=10 PROGRESS_EVERY=5000 \
JOB_NAME=mcc-quickstart-100k ./scripts/run-mcc-local-k8s.sh
Large runs include fixture generation and seeding before timed submission. Do not calculate claims per second from total Kubernetes job duration; use the validator's reported timed throughput. For the published clean 100K run, adjudication finished in under 30 minutes, while the full Kubernetes job took more than two hours because fixture preparation dominated the lifecycle.
Use Docker Desktop Kubernetes with the recommended 18 CPU / 24 GB allocation, keep the local service port-forwards active if you want console visibility, and expect existing demo-tenant state to affect seeding time. If the run publishes successfully, compare your output against the Episode 008 evidence archive. The target gates are zero platform failures, zero scoreable workflow mismatches, zero unexpected pends, and all comparable payments within one cent.
See the Million Claim Challenge guide for corpus design and the evidence archive for published results and limitations.
6. Verify CRD Discovery
Call the Da Vinci CRD CDS Hooks discovery endpoint
curl -s -H "X-Tenant-ID: demo" http://localhost:5080/cds-services | jq .The response should list the local CRD services, including cho-order-select and cho-order-sign. Browser testing needs a header extension or proxy that sends X-Tenant-ID: demo.
7. Check System Health
Inspect rollouts and logs
kubectl get deployments -n cloudhealthoffice
kubectl get pods -n cloudhealthoffice

# Recent portal and claims logs
kubectl logs -n cloudhealthoffice -l app=portal --tail=50
kubectl logs -n cloudhealthoffice -l app=claims-service --tail=50

# Find recent errors across services
kubectl logs -n cloudhealthoffice --all-containers --tail=20 | grep -i error || trueYou now have the Cloud Health Office platform running locally in Kubernetes, with claims adjudication, scored Million Claim Challenge evidence, and CRD discovery validated against the seeded demo tenant.
Next Steps
Now that you have a running local Kubernetes platform, explore these areas:
Kubernetes Reference
Review deeper troubleshooting, resource guidance, common kubectl tasks, and teardown commands.
Reference guide →Million Claim Challenge
Understand the deterministic corpus, answer key, workflow scoring, supported gaps, and published evidence.
Challenge guide →1M Evidence Archive
Review the full 1,000,000-claim asynchronous result, 100% eventual completion evidence, and the separate 100K raw X12 837 onramp run.
Inspect evidence →CMS-0057-F Compliance
Verify your health plan's compliance readiness with the full Patient Access, Provider Access, and Prior Auth APIs.
View guide →Deployment Reference
Review the path from local Docker to AKS, EKS, or GKE with gated releases, infrastructure controls, and environment-specific validation.
Deployment guide →